Tutorial (ppt)
Tested on 3D Slicer 4.10.2
- MacOS
- 3D Slicer (version 4.10.2) and openSCAD - After download, openSCAD needs to be opened via right-click & "Open" as it is not an official Apple-signed application
- Open 3D Slicer and click on the extensions button in the top right corner of the screen (it is blue and right next to the python logo).
- Click 'Install Extensions', then click the search bar in the top right corner.
- Search 'MeshToLabelMap' then click install (you will need to reload 3D Slicer after installing).
- Open 3D Slicer again and click on 'edit' at the very top of your screen and then click on 'Application Settings'.
- Click on 'Modules' and then either click 'Add' and specify where you downloaded the module (BrainKeyCreatorExtension.py), or drag the file location into the 'Additional modules' section.
- Close and then open, or restart 3D Slicer so that the module will load into your extension list.
- To find the module, click on the search bar to the right of 'modules' on the home screen of 3D Slicer and search BrainKeyCreatorExtension.
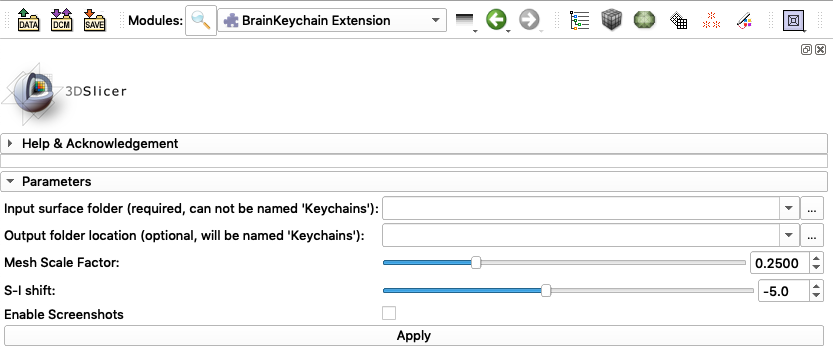
- You should then be able to load the extension and specify a directory for input surfaces (be sure to follow the example format that is in as a placeholder).
- The input folder of brain hemispheres should not be named Keychains, otherwise the keychains made by the script will be placed into the input folder.
- You will also be given the opportunity to specify and output location. If you do not, it will be placed in the same location as the input folder.
- Click 'Apply' and let the module run. If it says that 3D Slicer is not responding or has a loading icon, do not worry. The module takes roughly 3-5 minutes to render each keychain.
- After it has finished running you should have a directory called 'Keychains' in the output folder you specified, or the same as your input directory if you didn't write an output location.
- When using the extension, the left and right hemisphere surfaces have to be in "vtk" format, as well as contain "left" and "right" in the filename (freesurfer style lh & rh naming will not be recognized)
- Add KeySceneCreatorExtension.py the same way you added BrainKeyCreatorExtension.
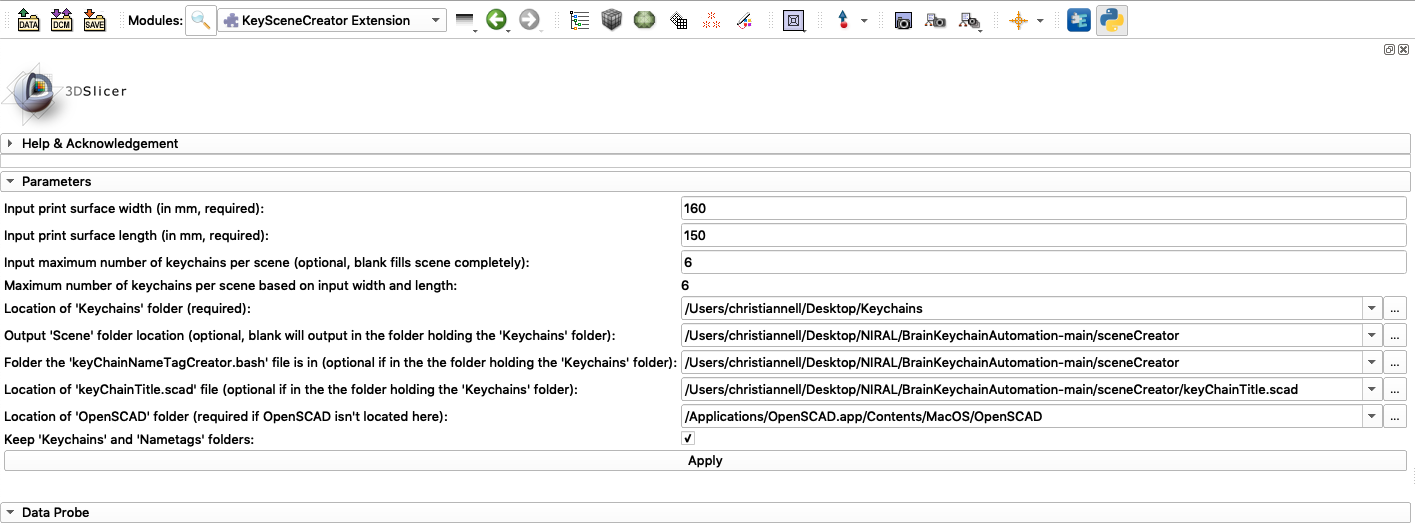
- Specify a print surface width and length.
- Each keychain should be less than 50 mm in length and width. Each keychain is allocated a 50 mm x 50 mm block on the print surface with an additional 20 mm in length for the nametag. Total, each keychain/nametag combination will an allocated block of 50 mm in width and 70 mm in length.
- This means if you specify a print surface with a width of 160 mm and length of 150 mm, it will output a 3 x 2 (width x length) field of keychains.
- Give the location of the input/ouput folders. The input folder in the location of the 'Keychains' folder. Just like the last script, if you don't give an output location it will automatically put it where the input (Keychains) folder is.
- Give the location of the bash file and openSCAD file (keyChainNameTagCreator.bash and keyChainTitle.scad) in the format of the example input.
- Make sure that the binary openSCAD application is located in the same folder as the one given. If it is not, it must be changed to where it is located in order to work.
- Lastly, keep the 'Keep Keychains and Nametags folders' keybox checked if you would like to keep seperate folders containing all the keychains and nametags. If you don't have a lot of storage on your machine, it is recommended you do not keep this checked.
- The script will create keychain/nametag scenes. They will be named 'keyChainScene' + 'some-iteration-number' in a directory called Scenes.
- If it says you do not have permission to run this file, you may need to run this command in the directory with the Bash file.
chmod 755 keyChainNameTagCreator.bash - If that does not work then run another chmod command that will give your device permission to run the executable.
Note
- The bash script takes a substring of the input surface name. It uses two regular expressions and three string matching statements to get the id.
- As of now this is hard coded and the string lengths and patterns must follow the following conventions.
- If you do not want to rename all your files to these conventions, there is one additional match that it will take.
- The pattern can be any string you like, since this is the default pattern match. (Be aware that if your string is more than 9-10 characters the letters will run off of the nametag because it is too long).
- The surface filename needs to be in one of the following example formats to work.
stx_neo-0207-1-1-1year-mid_left.vtk Or
stx_T0247-1-1-4year_mid_right.vtk Or
stx_noscale_241033_V06_t1w_RAI_mid_left.vtkOr
stx_stx_noscale_110940_V24_t1w_mid_surface_rsl_left_327680_native_NRRDSpace.vtkOr the default string match (what you choose to name it)
123-456.vtk- The script will take the substring '0207-1-1', 'T0247-1-1', '241033', '110940' and '123-456' respectively for these examples.
- First pattern matches the prefix stx_neo and then finds the string between that and the third - (after stx_neo-).
- Second pattern checks if the prefix equals stx_ then takes the next 9 characters in the string.
- Third pattern tests if the string prefix equals stx_noscale then takes the next 6 characters in the string (not including the _ after stx_noscale).
- Fourth pattern checks if the string prefix equals stx_stx_noscale and then takes the next 6 characters in the string (not including the _ after stx_stx_noscale).
- Final (default) pattern takes all characters from the string input filename.
- Download slicing software such as Ultimaker Cura and open it.
- Drag a print scene into the software and configure the printing setting to how you would like.
- Click slice and let the software add support structures. Then you are ready to print!
Christian Nell, Henry Pehr, Martin Styner (UNC-Chapel Hill)


